Here’s a secret: there’s no one-size-fits-all method to how a project creator should get things done. Different projects take different approaches; there are different approaches to the way rewards are done, how add-ons are organized, and how a project creator makes use of surveys and follow-up questions. As a tool, BackerKit’s admin interface is designed to be flexible to help project creators set things up the way that works best for them.
Reward Tier 101

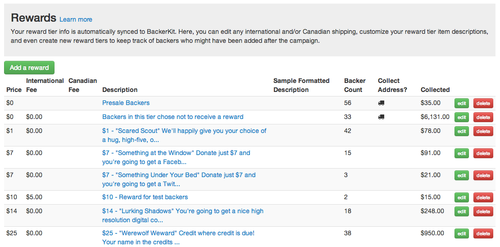
In the above picture, we can see how the “I’m Scared” project has set up their reward tiers. Some tiers can offer digital-only packages for backers; therefore a physical address becomes unnecessary. This is particularly useful for campaigns that offer a low reward tier for rewards that aren’t designed to ship, but rather are social incentives. At $7, backers can get a shout-out from the project via Facebook or Twitter, and for $25, a backer can pledge to have their name in the credits.

To mark this difference, a project creator can select the above option while creating or editing a reward tier.
Surveys: What to ask?
After setting up reward tiers, a project creator needs to focus on what kinds of questions they want to ask their backers. Surveys are useful for covering all of the basic things you need to know about a backer’s preferences for their base pledge tier.

When editing or creating a survey question, options are displayed regarding what reward tier backers can see and respond to. Below, we can see that this shirt question is only applicable to reward tiers that specified clothing.

In BackerKit, the answer system can be used several different ways: as a multiple choice question, as a form for text entry, and as a field for uploading a file, such as a custom picture. Multiple responses can be added to a question simply by clicking “Add an Answer”. In this project’s case, the answers are all size options for an article of clothing.

Below, is a different use case for survey questions. Here, an author is signing copies of a book as part of a reward, the question asks the backer who to make the signature out to.

So, you’ve put together your surveys and reward tiers. Let’s talk about add-ons.
Add-ons: Offering additional items to backers

The add-on system is one feature that’s particularly unique to BackerKit. It allows project creators to sell items in addition to the reward tier a backer pledged for. There’s a couple of things going on here that pull the cart experience together for the backer.
Variants
Let’s say a project creator puts a t-shirt in their add-on store. Needless to say, there are quite a few different ways to organize t-shirts: by style, by size, or by color are all common approaches that have been taken.

A good practice is to figure out what system of variant organization you want to go with, and stick with it for related add-ons of type. If you’re organizing t-shirts by size, organize pants the same way.
Shipping
There are two popular approaches to handling shipping on BackerKit: factoring international shipping into the prices of add-on items and rewards individually, or offering different shipping options as variants of a shipping add-on.

The latter is more convenient if international backers intend to buy a specific amount of items, such as 8 limited edition figurines for Warmachine:Tactics. By doing this, shipping is handled as a lump-sum based on how many things a backer wants to buy.

The former is better for projects that are less concerned about item amounts; the trade-off is that the add-on prices will vary depending on which option a project creator goes with. One option lumps the price into the product, the other lumps the price into its own package.
Follow-up Questions
Some items may be set up in complex ways that might require further instructions. Case for Humanity, for example, enables a backer to order a box with a custom engraving on it. Follow-up questions work like survey questions, but instead of being for specific reward tiers, they’re instead for different items.

One thing that’s convenient about follow-up questions is that one set of questions can be used multiple times. Let’s say a backer buys 2 engraved Case for Humanity boxes; the backer is able to customize the text for both boxes. The following text field and upload form appears twice to account for both products.

Lockdown
At some point, a project creator will need to specify when they’ll stop taking orders. Setting a lockdown date is easy; all a person has to do is set a date in the project settings.

After this date passes, the add-on store will finalize all existing orders and stop taking new ones. Of course, if a specific backer missed the lockdown date, the project creator can log in and unlock them individually.

Testing your flow

BackerKit ships with a useful tool for testing how a project’s entire flow is set up. When a project is set up with BackerKit, two test accounts are created: one US-domestic backer, and one International backer.

The project creator can easily log in as either one and walk through every section to test how they’ve set everything up. An admin can modify the test backer’s reward tiers and credit amount to test everything we’ve talked about above.
We hope this guide has been helpful for you in getting your project set up and good to go. If you have any questions, drop us a line.